
Page 9 - MIdWeek Kauai - Nov 17, 2021
P. 9
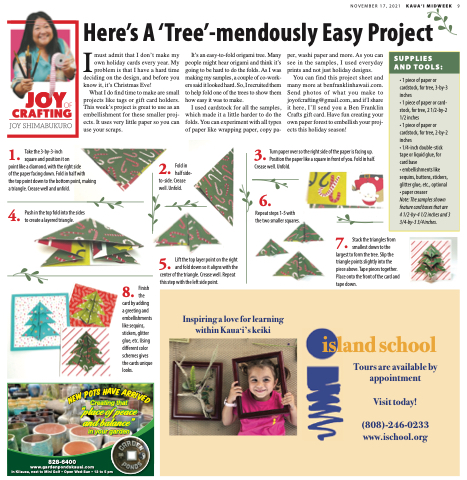
IHere’s A ‘Tree’-mendously Easy Project
must admit that I don’t make my It’s an easy-to-fold origami tree. Many per, washi paper and more. As you can own holiday cards every year. My people might hear origami and think it’s see in the samples, I used everyday problem is that I have a hard time going to be hard to do the folds. As I was prints and not just holiday designs.
NOVEMBER 17, 2021 KAUA‘I MIDWEEK 9
SUPPLIES AND TOOLS:
• 1 piece of paper or cardstock, for tree, 3-by-3 inches
• 1 piece of paper or card- stock, for tree, 2 1/2-by-2 1/2 inches
• 1 piece of paper or cardstock, for tree, 2-by-2 inches
• 1/4-inch double-stick tape or liquid glue, for
card base
• embellishments like sequins, buttons, stickers, glitter glue, etc., optional
• paper creaser
Note: The samples shown feature card bases that are 4 1/2-by-4 1/2 inches and 3 3/4-by-3 3/4 inches.
deciding on the design, and before you making my samples, a couple of co-work- You can find this project sheet and
know it, it’s Christmas Eve!
What I do find time to make are small
ers said it looked hard. So, I recruited them to help fold one of the trees to show them how easy it was to make.
projects like tags or gift card holders. This week’s project is great to use as an embellishment for these smaller proj- ects. It uses very little paper so you can use your scraps.
many more at benfranklinhawaii.com. Send photos of what you make to joyofcrafting@gmail.com, and if I share it here, I’ll send you a Ben Franklin Crafts gift card. Have fun creating your own paper forest to embellish your proj- ects this holiday season!
3. Turn paper over so the right side of the paper is facing up. Position the paper like a square in front of you. Fold in half.
I used cardstock for all the samples, which made it a little harder to do the folds. You can experiment with all types of paper like wrapping paper, copy pa-
1. Take the 3-by-3-inch square and position it on
point like a diamond, with the right side
of the paper facing down. Fold in half with
the top point down to the bottom point, making a triangle. Crease well and unfold.
4. Push in the top fold into the sides to create a layered triangle.
2. Fold in half side-
to-side. Crease well. Unfold.
Crease well. Unfold.
6.
Repeat steps 1-5 with the two smaller squares.
8. Finish the
card by adding
a greeting and embellishments like sequins, stickers, glitter glue, etc. Using different color schemes gives the cards unique looks.
5. Lift the top layer point on the right and fold down so it aligns with the
center of the triangle. Crease well. Repeat this step with the left side point.
7. Stack the triangles from smallest down to the
largest to form the tree. Slip the triangle points slightly into the piece above. Tape pieces together. Place onto the front of the card and tape down.
Inspiring a love for learning ������ �������� �����
island school
Tours are available by appointment
Visit today!
(808)-246-0233 www.ischool.org
Creating that
“place of peace
and balance”
in your garden
828-6400
www.gardenpondskauai.com
In Kilauea, next to Mini Golf • Open Wed-Sun • 12 to 5 pm
h
s
t
o
p
w
e
a
v
e
a
r
n
r
i
v
e
d
