
Page 9 - MidWeek Kauai - July 27, 2022
P. 9
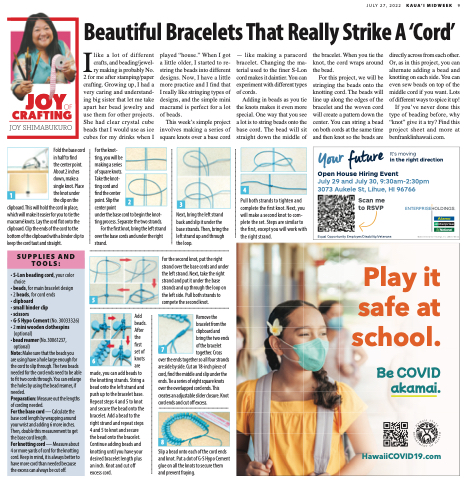
Fold the base cord in half to find
the center point. About 2 inches down, make a single knot. Place the knot under the clip on the
clipboard. This will hold the cord in place, which will make it easier for you to tie the macramé knots. Lay the cord flat onto the clipboard. Clip the ends of the cord to the bottom of the clipboard with a binder clip to keep the cord taut and straight.
For the knot-
ting, you will be
making a series
of square knots.
Take the knot-
ting cord and
find the center
point. Slip the
center point
under the base cord to begin the knot- ting process. Separate the two strands.
For the first knot, bring the left strand over the base cords and under the right strand.
Next, bring the left strand back and slip it under the base strands. Then, bring the left strand up and through the loop.
like a lot of different played “house.” When I got — like making a paracord the bracelet. When you tie the directly across from each other. crafts, and beading/jewel- a little older, I started to re- bracelet. Changing the ma- knot, the cord wraps around Or, as in this project, you can ry making is probably No. string the beads into different terial used to the finer S-Lon the bead. alternate adding a bead and
2 for me after stamping/paper designs. Now, I have a little cord makes it daintier. You can For this project, we will be knotting on each side. You can
crafting. Growing up, I had a very caring and understand- ing big sister that let me take apart her bead jewelry and use them for other projects. She had clear crystal cube beads that I would use as ice cubes for my drinks when I
more practice and I find that I really like stringing types of designs, and the simple mini macramé is perfect for a lot of beads.
experiment with different types of cords.
Pull both strands to tighten and complete the first knot. Next, you will make a second knot to com- plete the set. Steps are similar to the first, except you will work with the right strand.
stringing the beads onto the knotting cord. The beads will line up along the edges of the bracelet and the woven cord will create a pattern down the center. You can string a bead on both cords at the same time and then knot so the beads are
even sew beads on top of the middle cord if you want. Lots of different ways to spice it up!
This week’s simple project involves making a series of square knots over a base cord
Adding in beads as you tie the knots makes it even more special. One way that you see a lot is to string beads onto the base cord. The bead will sit straight down the middle of
If you’ve never done this type of beading before, why “knot” give it a try? Find this project sheet and more at benfranklinhawaii.com.
JULY 27, 2022 KAUA‘I MIDWEEK 9
IBeautiful Bracelets That Really Strike A ‘Cord’
It’s moving
in the right direction
Open House Hiring Event
July 29 and July 30, 9:30am-2:30pm 3073 Aukele St, Lihue, HI 96766
Scan me to RSVP
Equal Opportunity Employer/Disability/Veterans ©2022 Enterprise Holdings, Inc. L00147.06/22
4
1
2
3
Play it safe at school.
�� ����� �������
HawaiiCOVID19.com
SUPPLIES AND TOOLS:
• S-Lon beading cord, your color choice
• beads, for main bracelet design • 2 beads, for cord ends
• clipboard
• small binder clip
• scissors
• G-S Hypo Cement (No. 30033326) • 2 mini wooden clothespins
(optional)
• bead reamer (No. 30061237,
optional)
Note: Make sure that the beads you
are using have a hole large enough for the cord to slip through. The two beads needed for the cord ends need to be able to fit two cords through. You can enlarge the holes by using the bead reamer, if needed.
Preparation: Measure out the lengths of cording needed.
For the base cord — Calculate the base cord length by wrapping around your wrist and adding 6 more inches. Then, double this measurement to get the base cord length.
For knotting cord — Measure about 4 or more yards of cord for the knotting cord. Keep in mind, it is always better to have more cord than needed because the excess can always be cut off.
For the second knot, put the right strand over the base cords and under the left strand. Next, take the right strand and put it under the base strands and up through the loop on the left side. Pull both strands to compete the second knot.
5
Add beads. After the first set of knots are
made, you can add beads to the knotting strands. String a bead onto the left strand and push up to the bracelet base. Repeat steps 4 and 5 to knot and secure the bead onto the bracelet. Add a bead to the right strand and repeat steps 4 and 5 to knot and secure the bead onto the bracelet. Continue adding beads and knotting until you have your desired bracelet length plus an inch. Knot and cut off excess cord.
Remove the bracelet from the clipboard and bring the two ends of the bracelet together. Cross
6
7
over the ends together so all four strands are side by side. Cut an 18-inch piece of cord, find the middle and slip under the ends. Tie a series of eight square knots over the overlapped cord ends. This creates an adjustable slider closure. Knot cord ends and cut off excess.
Slip a bead onto each of the cord ends and knot. Put a dot of G-S Hypo Cement glue on all the knots to secure them and prevent fraying.
8
Your future
