
Page 8 - MidWeek Kauai - March 1, 2023
P. 8
8 KAUA‘I MIDWEEK MARCH 1, 2023
IHere Are Cute Ways To Celebrate Girls’ Day
SUPPLIES AND TOOLS:
• 5 1/2-inch-by-8 1⁄2-inch cardstock – solid color for the treat holder base
• 3-inch-by-8 1/2-inch cardstock – print
for kimono
• 4-inch-by-4-inch Beige/cream card- stock for face
• 4 1/2-inch-by-4 1/2-inch black card- stock for hair
• 1/4-inch double stick tape
• 1⁄4-inch hole punch
• 24 inches of 5/8 inch ribbon
• Black fine-tip Sharpie marker
• Pink-colored pencil for cheeks
• Score board
• Paper trimmer
• Pencil for tracing
• Scissors
• Treat – M&Ms package
• Optional: Embellishments for hair like stickers or stamped images, etc.
can’t believe that Friday is Girls’ the sample shown, a package of M&Ms. Day or Hinamatsuri! To celebrate, You can adjust the size of the base and I adapted a simple treat holder for then re-adjust the kokeshi doll face to
the occasion. match.
It is the pull-up treat holder that uses a simple piece of ribbon to hold and re- trieve your treat. Last year I made a large one to hold a packet of microwave pop- corn. This time I was able to incorporate the ribbon bow as part of the kokeshi doll’s hair decoration.
You can draw your own hair pattern or you can find the pattern on the project sheet at benfranklinhawaii.com. You’ll find lots of other projects that are great for celebrating Girls’ Day, too.
The size I made will fit things like pre-packaged Rice Krispie treats or, as in
So, as we get closer to the start of spring, I hope you can find time to make some crafts for both yourself and others. Have fun and, as always, happy crafting!
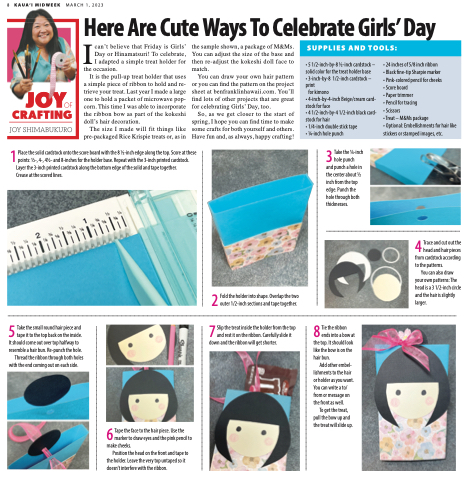
1 Place the solid cardstock onto the score board with the 8 1⁄2-inch edge along the top. Score at these points: 1⁄2-, 4-, 41⁄2- and 8-inches for the holder base. Repeat with the 3-inch printed cardstock.
Layer the 3-inch printed cardstock along the bottom edge of the solid and tape together. Crease at the scored lines.
3 Take the 1⁄4-inch hole punch
and punch a hole in
the center about 1⁄2 inch from the top edge. Punch the hole through both thicknesses.
2 Fold the holder into shape. Overlap the two outer 1/2-inch sections and tape together.
7 Slip the treat inside the holder from the top and rest it on the ribbon. Carefully slide it
down and the ribbon will get shorter.
4 Trace and cut out the head and hair pieces from cardstock according
to the patterns.
You can also draw
your own patterns: The head is a 3 1/2-inch circle and the hair is slightly larger.
5 Take the small round hair piece and tape it to the top back on the inside.
It should come out over top halfway to resemble a hair bun. Re-punch the hole.
Thread the ribbon through both holes with the end coming out on each side.
8 Tie the ribbon ends into a bow at
the top. It should look like the bow is on the hair bun.
Add other embel- lishments to the hair or holder as you want. You can write a to/ from or message on the front as well.
To get the treat, pull the bow up and the treat will slide up.
6 Tape the face to the hair piece. Use the marker to draw eyes and the pink pencil to
make cheeks.
Position the head on the front and tape to
the holder. Leave the very top untaped so it doesn’t interfere with the ribbon.
