
Page 4 - MidWeek Kauai - August 17, 2022
P. 4
4K
4
A
K
A
ST 17, 2022
A
U
U
A
A
‘
‘
I
I
M
M
I
I
D
D
W
W
E
E
E
E
K
K
A
U
U
G
G
U
U
S
IHere Are Three Sakura Projects To ‘Die’ For
love using my paper crafting sup- This week, I am sharing three sim- with their papercraft collections. terpiece. I made a stencil to ink blend plies and tools for projects other ple projects that put your metal dies to Now, you can make your own as well. some sakura on a card that I can use than paper. Metal dies are among use. I suggest simple shapes without You can die cut a single design or die as a name card at a place setting. A
my favorite tools. There are some for too many intricate cuts. cut several times on one sheet to cre- shrink plastic charm adorns a glass
making 3D boxes and bags, as well as some for interactive cards that pop- up, spin, flip and do many other fun things. I also like dies in my favorite shapes, like sakura.
The first project is to make stickers using colored vinyl. Just switch in vi- nyl for the cardstock that you would normally be cutting out. You can use the cutouts as stickers.
ate a background stencil.
My third idea is something I’ ve
jar for a favor.
Now, go through your die cut col-
Instructions:
1. Creating vinyl stickers: Set up your Sizzix Big
Shot die-cutting machine system with your die. Place a piece of colored adhesive vinyl where you would normally put cardstock. Use the vinyl side as the right side. Depending on how intricate the die is, you may have to do more than one pass through the machine.
I know not everyone has a Cricut or other electronic die-cutting machine, and although I have an electronic die cutter (or two), I still use my dies a lot.
The second project is to cut out the shape in blank stencil plastic. Sten- ciling has become very popular for paper crafting. You’ll see many com- panies creating coordinating stencil
With one die shape, I was able to create a matching set of projects. I made stickers to cover the glass block, which can be used for a cen-
If you need inspiration, you can find this project sheet and many more at benfranklinhawaii.com. Email what you make to joyofcrafting@ gmail.com. If I share it here, I’ll send you a Ben Franklin Crafts gift card.
been doing for a long time and that is to cut out shrink plastic shapes. You can make all kinds of cute charms and embellishments.
lection and see what you can use to make your own fun projects!
2. Remove the paper backing and use as a sticker. If you are using individual alphabets
to spell out a word, you may want to line up your letters first and apply transfer tape vinyl to the whole piece. Then, you can transfer the whole design to the surface and adhere the words at one time. Here are some stickers on a glass block.
3. Creating stencils: Set up your Sizzix Big Shot die-cutting machine system with your die. Instead of using card- stock, place a sheet of stencil blank plastic. Depending on how intri- cate the die is, you may have to do more than one pass through the machine.
SUPPLIES AND TOOLS:
• paper crafting dies, shapes* • 8-by-10-inch stencil blank
plastic (No. 30205016)
• vinyl, assorted colors, your
choice*
• shrink plastic (No. 30003145)
• Sizzix Big Shot die-cutting
machine system
• 1/8-inch hole punch
(No. 77178541)
• colored pencils
• sanding pad
• transfer tape vinyl, optional
• die pick, optional
• clear glass block, optional
• dye inks, optional
• blending daubers, optional
* Note: The sample used Spellbinders Sakura Blossoms (No. 30224178) and Bubblegum Pink Vinyl (No. 30201183)
4.Youcan
vidual stencils of just one design. Or, place the dies in a desired design arrangement to make one large stencil. Here the stencil is being colored in by ink blending.
5. You can use the die piece that comes out from the plastic as a traceable stencil. Or, pop it back into the plastic and use as a two-part stencil. Here, the stencil cutout has been popped back in to ink the center details.
6. Creating shrink art: Sanding your shrink plastic surface allows for mediums like colored pencils to be more vibrant. Die cut shrink plastic. If you are planning to hang this item, punch a small hole at the top with a 1/8-inch hole punch.
make indi-
7. Color the shrink plastic as desired. Shrink the plastic according to the directions using either a toaster oven or heat tool. The pieces will shrink in size and get thicker.
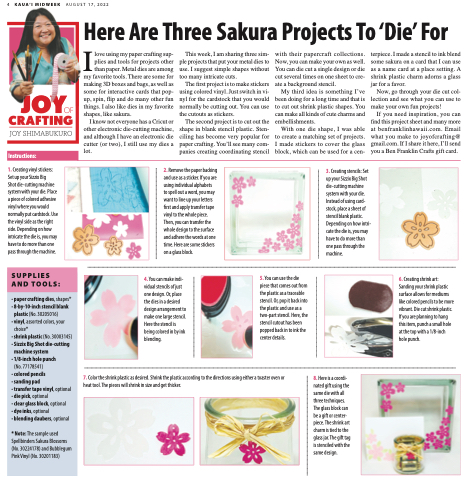
8. Here is a coordi- nated gift using the same die with all three techniques. The glass block can be a gift or center- piece. The shrink art charm is tied to the glass jar. The gift tag is stenciled with the same design.
