
Page 8 - MidWeek Kauai - Sep 21, 2022
P. 8
8 KAUA‘I MIDWEEK SEPTEMBER 21, 2022
AGo Totally Batty For This Halloween Craft
s crafters, we like to clouds. For one my samples, I a debate on whether to color ages on the tape to hold them in add depth and dimension. If celebrate all the holi- added Spanish moss. I remem- first then cut out the image, place. You can stick a part of the only one marker or pencil is days. For some, Hal- ber seeing moss hanging from or vice versa. Some say they image to the tape, just to hold it employed while using a light
loween is a favorite and some trees that surrounded a pond don’t want to waste their time still while you color. shade, you can darken areas by
SUPPLIES AND TOOLS:
For the fun part, I used stamped images of bats. These are cute bats from Lawn Fawn’s Fangtastic Friends. I colored some up with gray markers and for one sample I used pur- ple colored pencils. There is
And here’s a tip about col- oring: Generally, if you are trying to fill in an area, color in continuous circles without stopping. This will give you even coloring and won’t show streaks from straight strokes. You should also use the light- est shade first. Then, go back with slightly darker shades to
benfranklinhawaii.com.
people even create Hallow- een trees. To get you into that spooktacular mood, let’s make a Halloween ornament. We’re going to use the plastic fillable ornaments, which are easy to decorate on the inside because they come apart. You can fill the ornaments with a little bit of fiberfill to make them look like
when I visited Tennessee one year. It gave me a bayou-like feeling.
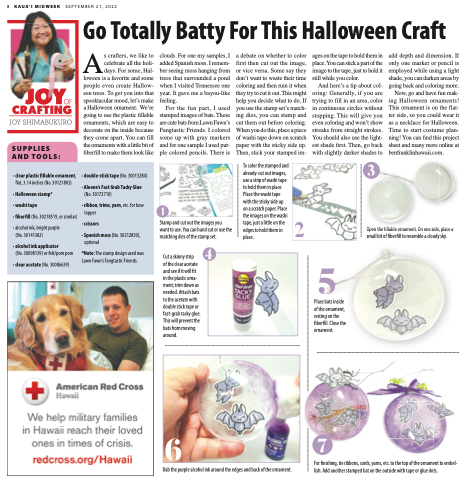
Stamp and cut out the images you want to use. You can hand cut or use the matching dies of the stamp set.
Cut a skinny strip
of the clear acetate and see if it will fit in the plastic orna- ment; trim down as needed. Attach bats to the acetate with double stick tape or fast-grab tacky glue. This will prevent the bats from moving around.
coloring and then ruin it when they try to cut it out. This might help you decide what to do. If you use the stamp set’s match- ing dies, you can stamp and cut them out before coloring. When you do this, place a piece of washi tape down on scratch paper with the sticky side up. Then, stick your stamped im-
To color the stamped and already-cut out images, use a strip of washi tape to hold them in place. Place the washi tape with the sticky side up on a scratch paper. Place the images on the washi tape, just a little on the edges to hold them in place.
going back and coloring more. Now, go and have fun mak- ing Halloween ornaments! This ornament is on the flat- ter side, so you could wear it as a necklace for Halloween. Time to start costume plan- ning! You can find this project sheet and many more online at
Open the fillable ornament. On one side, place a small bit of fiberfill to resemble a cloudy sky.
• clear plastic fillable ornament, flat, 3.14 inches (No. 30121803)
• Halloween stamp*
• washi tape
• fiberfill (No. 30218519, or similar)
• double-stick tape (No. 30013284) • Aleene’s Fast Grab Tacky Glue
(No. 30172710)
• ribbon, trims, yarn, etc. for bow topper
• scissors
• Spanish moss (No. 30212850),
optional
*Note: The stamp design used was Lawn Fawn’s Fangtastic Friends.
• alcohol ink, bright purple (No. 30141382)
• alcohol ink applicator
(No. 30098139) or felt/pom pom
• clear acetate (No. 30086639)
Place bats inside of the ornament, resting on the fiberfill. Close the ornament.
Dab the purple alcohol ink around the edges and back of the ornament.
For finishing, tie ribbons, cords, yarns, etc. to the top of the ornament to embel- lish. Add another stamped bat on the outside with tape or glue dots.
