
Page 9 - MidWeek Kauai - May 12, 2021
P. 9
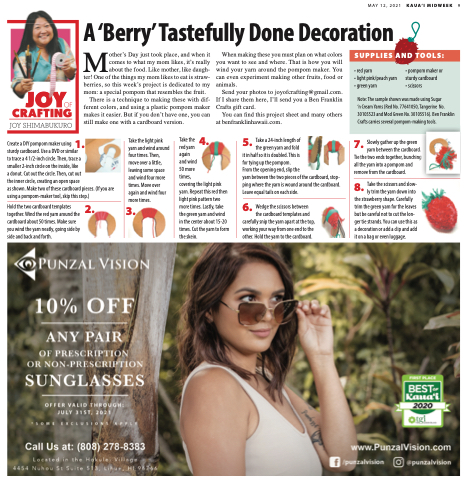
MA ‘Berry’ Tastefully Done Decoration
other’s Day just took place, and when it When making these you must plan on what colors comes to what my mom likes, it’s really you want to see and where. That is how you will about the food. Like mother, like daugh- wind your yarn around the pompom maker. You
        4.
5. Take a 24-inch length of the green yarn and fold it in half so it is doubled. This is
for tying up the pompom.
From the opening end, slip the
yarn between the two pieces of the cardboard, stop- ping where the yarn is wound around the cardboard. Leave equal tails on each side.
MAY 12, 2021
KAUA‘I MIDWEEK 9
    SUPPLIES AND TOOLS:
• red yarn
• light pink/peach yarn • green yarn
• pompom maker or sturdy cardboard
• scissors
Note: The sample shown was made using Sugar
‘n Cream Yarns (Red No. 77641050, Tangerine No. 30105523 and Mod Green No. 30105516). Ben Franklin Crafts carries several pompom-making tools.
  ter! One of the things my mom likes to eat is straw- can even experiment making other fruits, food or
berries, so this week’s project is dedicated to my mom: a special pompom that resembles the fruit.
animals.
Send your photos to joyofcrafting@gmail.com.
There is a technique to making these with dif- ferent colors, and using a plastic pompom maker makes it easier. But if you don’t have one, you can still make one with a cardboard version.
If I share them here, I’ll send you a Ben Franklin Crafts gift card.
You can find this project sheet and many others at benfranklinhawaii.com.
  Create a DIY pompom maker using 1. sturdy cardboard. Use a DVD or similar
to trace a 4 1/2-inch circle. Then, trace a smaller 2-inch circle on the inside, like
a donut. Cut out the circle. Then, cut out
the inner circle, creating an open space
as shown. Make two of these cardboard pieces. (If you are using a pompom-maker tool, skip this step.)
Take the light pink yarn and wind around four times. Then, move over a little, leaving some space and wind four more times. Move over again and wind four more times.
3.
Take the
red yarn
again
and wind
50 more
times,
covering the light pink yarn. Repeat this red then light pink pattern two more times. Lastly, take the green yarn and wind in the center about 15-20 times. Cut the yarn to form the skein.
7. yarn between the cardboard. .
Tie the two ends together, bunching g
all the yarn into a pompom and remove from the cardboard.
Take the scissors and slow- 8. ly trim the yarn down into the strawberry shape. Carefully trim the green yarn for the leaves but be careful not to cut the lon- ger tie strands. You can use this as a decoration or add a clip and add it on a bag or even luggage.
 Slowly gather up the green
             Hold the two cardboard templates together. Wind the red yarn around the cardboard about 50 times. Make sure you wind the yarn neatly, going side by side and back and forth.
2.
6.
Wedge the scissors between
   the cardboard templates and carefully snip the yarn apart at the top, working your way from one end to the other. Hold the yarn to the cardboard.
