
Page 8 - MidWeek Kauai - Nov 9, 2022
P. 8
8 K
N
K
A
EMBER 9, 2022
A
U
U
A
A
‘
‘
I
I
M
M
I
I
D
D
W
W
E
E
E
E
K
K
N
O
O
V
V
E
EDisplay Beautiful Ribbons Year After Year
very year, I look for- have rolls from years past that Styrofoam cone for the base. the edges together. I like to in coordinating colors to ward to seeing what I haven’t utilized. With the Styrofoam cone, I “scrunch” the edges as I glue make a nice holiday display. the new Christmas This week’s project is use floral greening pins to at- them. I think this gives the They also make great center-
ribbon designs are. what I used those for: rib- tach my ribbon to the cone. ribbon a little more body. pieces.
They give me ideas of ei- ther making wreaths or swags or even just wrapping pres- ents. When I really like a de- sign, I buy a few rolls — yes, I’ m a ribbon hoarder. I often
I hope you and your family have a “tree-riffic” time crafting this holiday season! You can find this project sheet and more at benfranklinhawaii.com.
bon trees. They are easy to make and you get to enjoy your pretty ribbons year after year. Plus, my cats don’t try to eat them!
your ribbon into approximately 65 pieces in 8-inch lengths. The number of ribbon pieces you need also depends on the size cone you use.
5 Continue adding rows of ribbon until you reach the top of the cone.
For the papier-mache, I use a low-temp glue gun.
2
After gluing rows of rib- bon layers to the cone, I top the tree off with either a loopy ribbon bow or some floral picks.
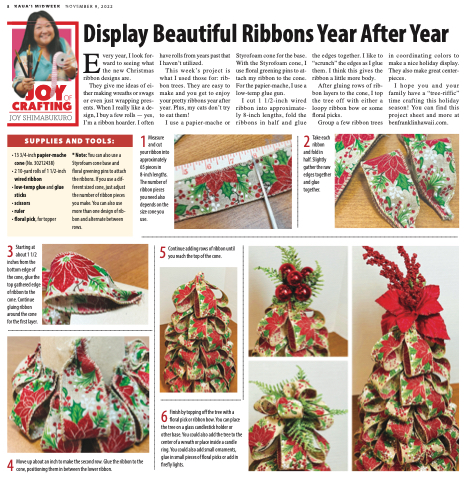
Take each
1 Measure and cut
ribbon and fold in
I use a papier-mache or
I cut 1 1/2-inch wired ribbon into approximate- ly 8-inch lengths, fold the ribbons in half and glue
Group a few ribbon trees
SUPPLIES AND TOOLS:
• 13 3/4-inch papier-mache cone (No. 30212438)
• 2 10-yard rolls of 1 1/2-inch
wired ribbon
• low-temp glue and glue
sticks
• scissors
• ruler
• floral pick, for topper
* Note: You can also use a Styrofoam cone base and floral greening pins to attach the ribbons. If you use a dif- ferent sized cone, just adjust the number of ribbon pieces you make. You can also use more than one design of rib- bon and alternate between rows.
half. Slightly gather the raw edges together and glue together.
3 Starting at about 1 1/2
inches from the bottom edge of the cone, glue the top gathered edge of ribbon to the cone. Continue gluing ribbon around the cone for the first layer.
4 Move up about an inch to make the second row. Glue the ribbon to the cone, positioning them in between the lower ribbon.
6 Finish by topping off the tree with a floral pick or ribbon bow. You can place
the tree on a glass candlestick holder or other base. You could also add the tree to the center of a wreath or place inside a candle ring. You could also add small ornaments, glue in small pieces of floral picks or add in firefly lights.
