
Page 8 - MidWeek Kauai - Sep 8 2021
P. 8
8 KAUA‘I MIDWEEK SEPTEMBER 8, 2021
ICards With Pops Of Personality
SUPPLIES AND TOOLS:
• 4 1/4-by-11-inch cardstock, solid or printed for base
• 2 3/4-by-5 1/4-inch cardstock, for pop-up insert
• 1/4-inch double-stick tape
• We R Memory Keepers Trim & Score Board
• craft knife
• cutting mat
• metal-edged ruler
• pencil
• scissors
• embellishments (stickers, die cuts, stamped images, etc.)
’m back with my fa- Adding a photo makes this make them a card to brighten vorite kind of crafting: more into a gift because they their day. That’s what I had in making cards! This is can display the finished card mind for the sample I made
a great time to play around like a photo stand. Wouldn’t this week.
with different designs, so you can choose a couple for your holiday card-making.
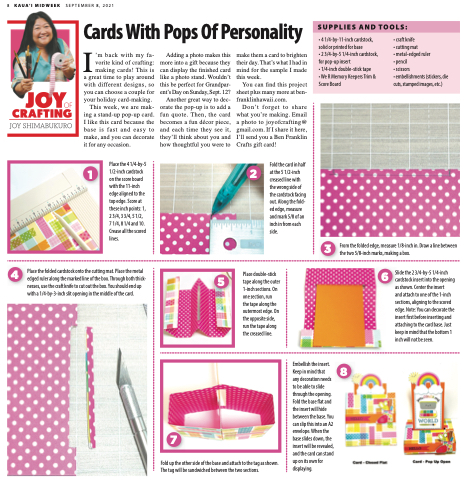
Place the 4 1/4-by-5 1/2-inch cardstock on the score board with the 11-inch edge aligned to the top edge. Score at these inch points: 1, 23/4,33/4,51/2, 71/4,81/4and10. Crease all the scored lines.
Place the folded cardstock onto the cutting mat. Place the metal edged ruler along the marked line of the box. Through both thick- nesses, use the craft knife to cut out the box. You should end up with a 1/4-by-3-inch slit opening in the middle of the card.
this be perfect for Grandpar- ent’s Day on Sunday, Sept. 12? Another great way to dec- orate the pop-up is to add a fun quote. Then, the card becomes a fun décor piece, and each time they see it, they’ ll think about you and how thoughtful you were to
You can find this project sheet plus many more at ben- franklinhawaii.com.
This week, we are mak- ing a stand-up pop-up card. I like this card because the base is fast and easy to make, and you can decorate it for any occasion.
Don’t forget to share what you’ re making. Email a photo to joyofcrafting@ gmail.com. If I share it here, I’ ll send you a Ben Franklin Crafts gift card!
1
2
Fold the card in half at the 5 1/2-inch creased line with the wrong side of the cardstock facing out. Along the fold- ed edge, measure andmark5/8ofan inch in from each side.
3
From the folded edge, measure 1/8-inch in. Draw a line between the two 5/8-inch marks, making a box.
Slide the 2 3/4-by-5 1/4-inch 6 cardstock insert into the opening
as shown. Center the insert
and attach to one of the 1-inch sections, aligning to the scored edge. Note: You can decorate the insert first before inserting and attaching to the card base. Just keep in mind that the bottom 1 inch will not be seen.
4
Place double-stick tape along the outer 1-inch sections. On one section, run
the tape along the outermost edge. On the opposite side, run the tape along the creased line.
5
7
Embellish the insert. Keep in mind that
any decoration needs to be able to slide through the opening. Fold the base flat and the insert will hide between the base. You can slip this into an A2 envelope. When the base slides down, the insert will be revealed, and the card can stand up on its own for displaying.
8
Fold up the other side of the base and attach to the tag as shown. The tag will be sandwiched between the two sections.
